- Photo Safaris
- Alaska Bears & Puffins World's best Alaskan Coastal Brown Bear photo experience. Small group size, idyllic location, deluxe lodging, and Puffins!
- Participant Guestbook & Testimonials Candid Feedback from our participants over the years from our photo safaris, tours and workshops. We don't think there is any better way to evaluate a possible trip or workshop than to find out what others thought.
- Custom Photo Tours, Safaris and Personal Instruction Over the years we've found that many of our clients & friends want to participate in one of our trips but the dates we've scheduled just don't work for them or they'd like a customized trip for their family or friends.
- Myanmar (Burma) Photo Tour Myanmar (Burma) Photo Tour December 2017 -- with Angkor Wat option
- Reviews Go hands-on
- Camera Reviews Hands-on with our favorite cameras
- Lens reviews Lenses tested
- Photo Accessories Reviews Reviews of useful Photo and Camera Accessories of interest to our readers
- Useful Tools & Gadgets Handy tools and gadgets we've found useful or essential in our work and want to share with you.
- What's In My Camera Bag The gear David Cardinal shoots with in the field and recommends, including bags and tools, and why
- Articles About photography
- Getting Started Some photography basics
- Travel photography lesson 1: Learning your camera Top skills you should learn before heading off on a trip
- Choosing a Colorspace Picking the right colorspace is essential for a proper workflow. We walk you through your options.
- Understanding Dynamic Range Understanding Dynamic Range
- Landscape Photography Tips from Yosemite Landscape Photography, It's All About Contrast
- Introduction to Shooting Raw Introduction to Raw Files and Raw Conversion by Dave Ryan
- Using Curves by Mike Russell Using Curves
- Copyright Registration Made Easy Copyright Registration Made Easy
- Guide to Image Resizing A Photographers' Guide to Image Resizing
- CCD Cleaning by Moose Peterson CCD Cleaning by Moose Peterson
- Profiling Your Printer Profiling Your Printer
- White Balance by Moose Peterson White Balance -- Are You RGB Savvy by Moose Peterson
- Photo Tips and Techniques Quick tips and pro tricks and techniques to rapidly improve your photography
- News Photo industry and related news and reviews from around the Internet, including from dpreview and CNET
- Getting Started Some photography basics
- Resources On the web
- My Camera Bag--What I Shoot With and Why The photo gear, travel equipment, clothing, bags and accessories that I shoot with and use and why.
- Datacolor Experts Blog Color gurus, including our own David Cardinal
- Amazon Affiliate Purchases made through this link help support our site and cost you absolutely nothing. Give it a try!
- Forums User to user
- Think Tank Photo Bags Intelligently designed photo bags that I love & rely on!
- Rent Lenses & Cameras Borrowlenses does a great job of providing timely services at a great price.
- Travel Insurance With the high cost of trips and possibility of medical issues abroad trip insurance is a must for peace of mind for overseas trips in particular.
- Moose Peterson's Site There isn't much that Moose doesn't know about nature and wildlife photography. You can't learn from anyone better.
- Journeys Unforgettable Africa Journeys Unforgettable -- Awesome African safari organizers. Let them know we sent you!
- Agoda International discounted hotel booking through Agoda
- Cardinal Photo Products on Zazzle A fun selection of great gift products made from a few of our favorite images.
- David Tobie's Gallery Innovative & creative art from the guy who knows more about color than nearly anyone else
- Galleries Our favorite images
A Photographers' Guide to Image Resizing
By Dave Ryan, February, 2006
How big is my photo, or how big can I make it? Sounds like a simple enough question, but it’s among the most frequently asked questions by those new to digital imaging. And when the answer starts coming in terms of megapixels, megabytes and pixels per inch(ppi) it can leave the newcomer wondering why it all has to be so complicated.
With film it was easy, you can hold a slide or negative in your hand and see just how big it is. With a little experience you can figure out how far you can stretch that 35mm or medium format image with an enlarger without losing too much quality. Why does it have to be so difficult with digital? Unfortunately one outcome of the complexity of pixels and bytes is to adopt generalized rules and half truths to try to cope with the information overload. When your webmaster throws out something like “send me the image at 72dpi” you’re getting a rote answer and only half the equation but it’s an increasingly common way that folks strive to tame the subject of digital image size with simple answers. So how big is your photo? Is there a way to relate all those megapixels and megabytes?
Pixel dimensions and Native Image Size
One way to describe the size of a digital image is to count up the pixels in the horizontal and vertical directions. Say you take a photo with your Nikon D70s in JPEG Fine mode. Straight out of the camera you’ll get an image with 3008 pixels in the horizontal direction and 2000 pixels in the vertical direction. Multiply them and you’ve got the infamous megapixels that the marketing folks like to bombard us with. In the case of the D70s 3008 multiplied by 2000 is a tad over 6 million pixels or 6 megapixels in the jargon. These are the native dimensions or native resolution of your digital image. In other words this is the image info straight out of your camera before any cropping or resizing. I’m not shy about resizing my images, but you’ll never beat the quality of the image at its native resolution so it’s a good starting point for talking about image sizes.
Last things first, start by understanding your output device
This might sound crazy, but when we talk about the size of a digital image it all depends on what we’re going to do with it. The same image takes on an entirely different size when sent to a photo quality printer than it does on your computer monitor. Even sending it to different monitors can change its size dramatically. How can the exact same image change its physical dimensions just by sending it to different devices? Well it all depends on the output resolution of the device you’re using to reproduce your photo. Sometimes you can alter that resolution, sometimes you just have to take what’s given to you but understanding output resolution is the first step to understanding image size.
This Nikon D2x image had pixel dimensions of 4288x2848 straight out of the camera.
But what does that mean in real world terms?
Monitor settings and pixels
In the simplest sense a monitor’s job is to display a grid of colored dots called pixels on your screen. The color and brightness of each pixel can be individually set to reproduce photorealistic images. But the number of pixels is fixed according to your computer’s hardware and system preferences settings. Depending on the make and model of your computer’s monitor, the type of graphics card installed in your computer and the specific settings in your computer’s control panel your monitor will be able to reproduce a limited number of pixels on your screen. Typical screen resolutions include: 800x600, 1024x768, 1280x1024, and 1600x1200. These numbers refer to the number of pixels displayed in the horizontal and vertical directions accordingly. Even though the Display>Settings screen in Window’s (Macs have a similar screen) calls this “Screen Resolution” technically it’s just the number of pixels that your monitor will display in each direction. So how do you get from those monitor pixel dimensions listed above to actual screen resolution?
Translating pixel dimensions to screen resolution
To get the actual resolution you also have to know the physical screen size in inches. To further complicate things the screen dimensions we’re interested in are the actual horizontal and vertical size in inches not the 17”, 19” or other diagonal measurements that are used to sell monitors. For instance the monitor I’m using at the moment has a viewable display size of approximately 12.5”x9.5”. My “Screen Resolution” setting in the Window’s control panel is set to 1024x768 pixels. Dividing the pixel dimensions by the screen size in inches and rounding just a bit I get a screen resolution of 81 ppi(pixels per inch sometimes called dots per inch or dpi). My laptop screen is a bit smaller and the graphics adapter is set to a higher mode so its resolution is approximately 94 ppi. I work with some very nice 20” Apple Cinema displays and they’re set to approximately 98 ppi. So we’ve done a bit of arithmetic, big deal, how do you use this information?
Digital photo sizes on a monitor
So you’ve got an image you want to display, let’s say one of those native D70s photos discussed above which gives you 3008x2000 pixels to display on your screen. If I viewed that on the screen I’m working on with its 81 ppi resolution I’d get an image that’s approximately 37”x25”. If I viewed it on one of the 20” Apple Cinema displays I use it would be approximately 31”x20” at the 98 ppi resolution of those screens. Well these monitors just aren’t nearly that big so unless I use some on the fly resizing software like Window’s jpegfile for viewing most of my image wouldn’t fit on the screen. How am I coming up with these numbers, easy take the image’s horizontal and vertical dimensions and divide them by the screen resolution in ppi. In other words 3008 divided by 81 gives me approximately 37” and 2000 divided by 81 gives me approximately 25”. Luckily you don’t actually have to do the math, there are nice image sizing tools in your image editor that take care of that part but it’s all based on dividing the image dimensions in pixels by the pixel spacing of your output device.
So what about 72 dpi
Once upon a time a lot of folks used smaller monitors set to display 800x600 pixels. A lot(but not all) of these gave you a screen resolution of 72 dpi. Enough in fact that 72 dpi became the assumed standard for all web and monitor display use and was dubbed low res (pronounced rez) for low resolution output. It was a convenient approximation of folk’s monitor settings then but a total myth today in the era of high resolution graphics cards and big monitors. But the myth persists and more than one web master has insisted on images at 72 dpi. A better way of describing images destined for web and email use would be to define them in terms of their actual pixel dimensions for instance asking for a 400x600 image. If someone simply asks you for a 72 dpi image, without any qualifiers then you’ve got to ask yourself what the reasonable image dimensions are for the intended use. For instance if you think your image will be used as a 2”x3” image on a web site then multiply that by the 72 dpi requested and give them an image with pixel dimensions of 144x216. Better yet round it up a bit to account for larger monitors say to 200x300. Entering the requested resolution and your intended size in inches will give you what you want from most image editing programs. I always try to keep clients happy and give them what they ask for in terms of dpi settings but in the end it really doesn’t matter for web images.
Cut to the chase and think in pixel dimensions for screen use
When you get right down to it that resolution tag that is embedded with your image file just doesn’t matter for web and email use. Your web browser doesn’t open up the file and look at that information and as I’ve said real world monitors are all over the map in terms of their actual screen resolution. For web use the only thing that really counts is the actual image dimensions in pixels. Getting back to the D70s example, if you try to display its native 3008x2000 pixel file on a 1024x768 screen it’s easy to see the image won’t fit. Most web browsers will handle the downsizing necessary to display that image but you often get problems such as straight lines that get jaggy or overly soft images and you’ll be sending an unnecessarily large file out over the web slowing things down a lot. You can avoid the resolution math and simply supply images that easily fit within common screen dimensions.
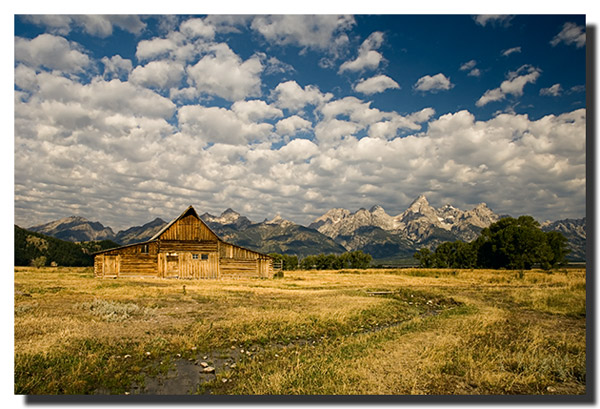
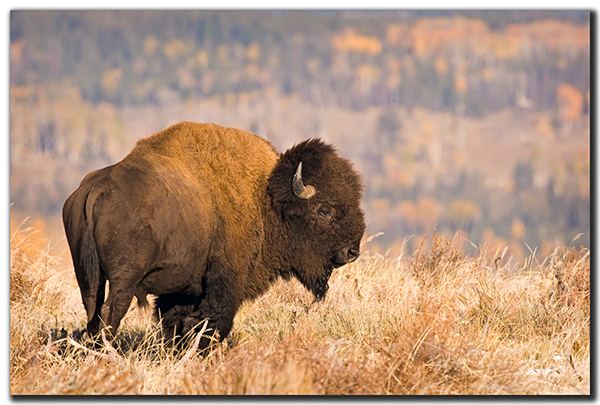
If you want your images to be universally viewable without resizing then make sure they fit within the 800x600 limits of older screens. Don’t forget that web browser borders and email in-boxes take up some of that screen real estate as well. If you really want aunt Margaret to be able to see your photo within her email window and without launching an external image viewer then you’d better limit your image height to a few hundred pixels unless you know she sports a nice big graphics monitor operating in a high resolution mode. Ever receive an email with an attached photo only to see a huge zoomed in view of your friend’s new baby? Sure you see the tip of their nose but have to scroll around or launch an external viewer to see the rest of the photo. That’s what happens when folks don’t grasp how images are displayed on monitors. A common guideline for posting web images is to limit the largest dimension to 600 pixels. Yep this will display at different sizes depending on the monitor used to view it but it will be fairly large and fit comfortably on all but the oldest monitors and even then the resizing will be minimal. By thinking in terms of pixel dimensions when working for web and email output you can save yourself a lot of mental gymnastics and quickly arrive at an appropriate image size. The bottom line is that monitors vary so pick a common size like 1024x768, allow for some pixels lost to borders and size your image to fit comfortably within those limits.
 |
|
|
Sized to 600 pixels in width this image fits nicely into my browser. It takes up a bit more than half width of my monitor. How does it fit on yours? By the way I saved it with the resolution set the ridiculous value of 1000 ppi notice any difference? I didn’t think so.
|
But how big will my prints be?
Unlike monitors, typical high quality print resolutions range from 180 ppi on the low end to 360 ppi for professional quality results. Another big difference is that these print resolutions aren’t fixed in the printer the way they are in a monitor. You can take the same file and send it to the printer at any resolution setting you choose. Basically when you do this you’re telling the printer how far apart to place the individual pixels on the printed page. Place them too far apart and your image will take on a blocky digitized look. Place them unnecessarily close like 720 dpi and you’ll be limited to a very small print with no added quality. Remember that resolution tag that was ignored for web use? Well it’s exactly how we control printing resolution for hard copy output so we can’t ignore it any longer. Unlike your web browser, your printing program looks at the resolution tag and uses the value you enter there to control the printer itself.
A word about printer resolutions
When we buy photo quality printers we see advertised resolutions like 1440 dpi not the measly 300 ppi described above. Remember that color printers create their wide range of photo quality colors by placing tiny droplets of different ink colors down to create all their combinations of color and brightness. A big number like 1440 dpi is a good thing in a high quality printer, but it’s not the resolution you care about when sending a file to the printer. There are a lot of terminology debates raging in the photo world but one deals with dpi vs. ppi vs. other ways to describe resolution. I use the term dpi to describe actual droplets of ink like the 2880x1440 micro droplets of ink placed on the page by my Epson printer or in the places where it’s just historical convention like 72 dpi. I use the term ppi to describe the much larger pixels displayed on a screen or sent to the printer. Others use these terms differently. Just remember that a pixel is the smallest piece of color and tone information in a digital image but a photo quality printer uses a whole bunch of tiny droplets of ink to synthesize each pixel on the printed page.
Using print resolution to control print sizes
So now you’ve got some control on your sizing your prints by adjusting the resolution setting. But what are the tradeoffs? Take that same native D70s file at 3008x2000 pixels and print it at 300 ppi and you’ll get a 10”x6.67” print. Print it at 240 ppi and the same file gives you a 12.5”x8.33” print and at 180 ppi you’ll get a whopping 16.7”x11.1” print. All from the same native file without any image resizing. Of course there’s no free lunch, as you print at lower resolutions you’ll eventually reach the point where the individual pixels are spread too far apart on the page and your image will suffer. How far can you push the resolution to get big prints? Well that’s up to you and depends on your printer, the paper and inks you use and your own quality standards. There’s no absolute here, but many folks consider 300 ppi the gold standard for high quality output on modern ink jet photo printers. It’s such a common high quality setting that it’s earned the name high res and is a standard image resolution in the publishing industry. Some printers work better at 360 ppi and the folks that set their file resolutions that high insist they can see the subtle differences. Personally I’ve had very good luck printing files at 240 ppi. It doesn’t work for every image but if I need a large print I’ll usually try a proof at 240 ppi before I resort to enlarging my image in PS. If the proof shows pixilation or the telltale stripes known as banding I’ll upsize to 300 ppi and print another proof. I’ve tested lower print resolutions and have found 240 ppi to be the low end for most of my work. Exceptions include printing on rough matte card stock or images destined for newsprint that can tolerate lower resolution settings. Your results may vary so take some time to print a couple of test images on the different papers you use and at different resolution settings. A few tests with crops from well shot images should tell you how far you can push your image sizing through resolution alone. I like to stick to resolutions that scale nicely to the 1440 dpi that my printer is capable of like 180, 240, 288 and 360 but always send out work destined for print at the industry standard 300 ppi since I don’t know what print process they’ll use and like to give clients what they’ve asked for.
How do I get even bigger prints?
When dropping your print resolution isn’t an option or you’ve dropped it far as you’re willing to go it’s time to upsize your image in PS or some other image editing program. I always teach upsizing images as a two step procedure in my PS workshops. You can do this as a single step in most image editors, but I think the two step approach helps you see exactly what you’re doing and helps you understand how far you’re attempting to push your image.
-
The first step is to simply choose your print size and see how much your resolution drops. I do this in the PS Image Size dialog by unchecking the Resample Image checkbox at the bottom of the dialog box. With resampling disabled I enter the desired print dimensions. Unless you want the funhouse hall of mirrors effect it’s best to leave the Constrain Proportions box checked and enter only the height or width. Whichever you change the other dimension will change proportionally. If you enter larger dimensions the Resolution field will drop accordingly. Say you take that same old 3008x2000 image from its native 10”x6.7” at 300 ppi and enter 20” in the width field. The height will change to 13.4” and the resolution will drop to 150 ppi. All we’ve done at this point is told the printer how big an image we want. The print dialog has responded by telling us how far apart the native pixels have to be placed to make this happen. Well from my tests I know I won’t be happy with a high quality glossy print at 150 ppi so I’ve got to take another step.
-
With the pixels spread so far apart on the page we’ll start seeing the individual dots that make up the image so we’ve got to fill in the spaces. This process of filling in the voids with estimates of what would have been there if we’d started with a higher resolution file (say from a 24 Mpixel film scan instead of a 6 Mpixel D70s) is called interpolation. It’s just a term from statistics that means estimating and filling in the missing data between known data points. To interpolate in PS we check the Resample Image checkbox and enter our desired print resolution. You’ve got several choices in terms of the math used to do the interpolation. The three best choices in the current generation of PS products are Bicubic, Bicubic Smoother and Bicubic Sharper. Each of these uses a sophisticated curve fitting technique and uses pixels to the left right, above and below the gaps between your native pixels to estimate and fill in the blanks. Bicubic is a great option for moderate resizing say up to 50% larger or smaller. For aggressive upsizing the Bicubic Smoother option reduces the blocky look that often results from digital enlargements. When doing dramatic downsizing, for instance when preparing images for the web, the Bicubic Sharper option reduces the edge softening that comes from throwing away image information.
Photoshop’s interpolation options and those of dedicated resizing programs like Genuine Fractals are very sophisticated but they can’t create image information that simply wasn’t there. The illusion of missing data created by interpolation is very convincing and I don’t hesitate to double or even triple the size of well shot images but there are limits to how far you can push this. Again it’s up to your own sense of quality and you’ll have to experiment to find out how much interpolation you’re happy performing. If your image is destined for an art gallery you’ll probably limit yourself to minimal interpolation but you might feel comfortable printing posters from images that were originally 20% or less of the final poster size.
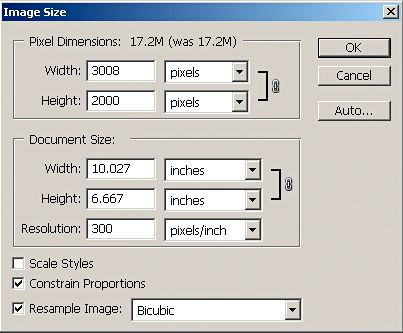 |
Photoshop’s Image Size dialog box makes it easy to resize your photos for print or web use by taking care of the resolution math. By unchecking the Resample Image box you can use it as a what if… calculator to see what size prints you can get at different print resolutions without changing the native pixel dimensions of your image. |
With practice you can just go into the image dialog box, leave the Resample Image box checked and enter your new print size and resolution but I think it’s best to start with the two step approach. For one thing it reinforces the idea that your image sizing occurs when you spread the native pixels apart on the paper. It also helps you to recognize when you’re asking too much. If for instance you start with an image you received in an email with pixel dimensions of 400x600 and want to print an 8”x12” print you’ll find out quickly that you’re asking a lot. At your desired 8”x12” dimensions your resolution drops to a paltry 50 ppi. The 6x interpolation it takes to get that up to 300 ppi is asking a lot and doing your resizing in two discrete steps makes this very clear. With a bit of practice you’ll get a feel for how far you can stretch images based on their native pixel dimensions and then you can jump right in and do the resizing in a single step.
Moving to Megabytes
Pixel dimensions might be the best way to describe the content of an image file, but when it comes to storing them on your disk or understanding how much RAM you need to edit them in PS it’s helpful to think of file sizes in Megabytes(MB). With practice you start associating file sizes in MB to print sizes. I know I can get a good 8”x10” print out of a well shot JPEG that opens to 17 MB or more in PS. But all MB are not created equal. You’ve got to specify whether you’re talking about the file size while opened in your image editor or the size of the file saved on your hard disk or CF card. The two versions of file size in MB can vary substantially depending on the file format used to save your image.
How many bytes to the pixel?
If you’re talking about the size of a file opened in an image editing program it’s easy to convert Megapixels to Megabytes. For instance, an image shot in 8 bit RGB mode has 8 bits of red, 8 bits of green and 8 bits of blue information for every pixel. In computer parlance 8 bits equals one byte which gives you 3 bytes of data for each image pixel. So a camera with roughly 6 million pixels like the D70s creates images with roughly 18 million bytes of image data. Sure there’s a bit more information stored in the file including your shooting info but the image itself has approximately 18 million bytes of data. But we’re talking about computers here and there’s another tiny twist. While scientists and engineers define a Mega as a million of something, computer programmers define a Megabyte as 1,048,576 bytes. It’s because computer folks work in the binary numbering system and their definition of Mega fits nicely into that system. So PS tells us that our 18 million pixel D70s file is actually just over 17 Megabytes. In other words for an 8 bit RGB file you can get from Megapixels to Megabytes by multiplying by 3 and then taking 95% of the result. If you’re working with 16 bit files you just double your results since each color is now described by 2 bytes of data. So the size of your file while opened in an image editor is pretty straight forward, but how much room will that same file take up on your disk drive?
Sizes of saved image files
The size of an image file saved on your disk can vary widely depending on the file format you use for saving, the quality settings you use while saving and the content of the image itself. An uncompressed Tiff will take up as much room on your disk as the open file did in your editor. Save that same Tiff with lossless LZW compression and the saved file can easily drop to a quarter of its open size with no quality loss. Save it as a maximum quality JPEG and it can drop to ten percent of its open size depending on the image and saved as a minimum quality JPEG it can drop to less than one percent of its open size. So you’ve got to be careful estimating image sizes based on the saved file size. But those sizes on disk can give you some clues. If you’re handed a JPEG that takes up a couple of hundred kilobytes and it opens to a 17 MB file then you can be sure it’s undergone some heavy handed JPEG compression. Zoom in to 100% and take a careful look at areas of smooth detail like blue skies or blurred backgrounds. Even odds you’ll find blocky compression artifacts instead of the smooth tonal transitions that you might have found in the original.
So how big is my digital image?
In the end one could argue that a digital image is only as big as its pixel dimensions. Trouble is we live in the physical world and are more interested in whether it’s a 4”x5” or an 8”x10” than how many pixels it holds. If our output was always to print or always for web use it would be easy but these days photographers routinely print an image at several sizes and downsize copies of the same image for web use. Keeping a handle on the native resolution of your image and the resolution of your output devices is the key to intelligent image resizing. With so many image sizing options only a mouse click away it’s easy to go overboard. As sophisticated as modern resizing tools have become you’ve got to remember that upsizing or downsizing an image will never create detail that didn’t exist in your native image and that just like enlarging film in the darkroom there are limits to how far you can stretch your photos. Are there rules for this stuff? Nope, you’re still in charge of your images and your artistic vision. Don’t believe it when someone tells you that any interpolation ruins an image but be equally suspicious of claims that such and such software allows huge increases in image size with no quality loss. In the end they’re your images and you’ve got to decide what resolution you like to use for printing and how far you’re willing to stretch an image.
--Dave Ryan for nikondigital.org
About Dave Ryan: Dave is a photographer, photo instructor and mountain guide in Jackson Hole, Wyoming. He sells greeting cards as well as stock photographs of action sports, wildlife and landscapes. He views digital photography as the ideal merging of his love for photography and his career as an electronics engineer specializing in digital signal processing systems. He is a regular contributor to the forums here on nikondigital.org

Latest posts
-
Tue, Jun 14 2022
-
Fri, Jul 9 2021
-
Mon, Mar 1 2021
-
Tue, Mar 3 2020
-
Wed, Jan 15 2020
-
Mon, Nov 11 2019