- Photo Safaris
- Alaska Bears & Puffins World's best Alaskan Coastal Brown Bear photo experience. Small group size, idyllic location, deluxe lodging, and Puffins!
- Participant Guestbook & Testimonials Candid Feedback from our participants over the years from our photo safaris, tours and workshops. We don't think there is any better way to evaluate a possible trip or workshop than to find out what others thought.
- Custom Photo Tours, Safaris and Personal Instruction Over the years we've found that many of our clients & friends want to participate in one of our trips but the dates we've scheduled just don't work for them or they'd like a customized trip for their family or friends.
- Myanmar (Burma) Photo Tour Myanmar (Burma) Photo Tour December 2017 -- with Angkor Wat option
- Reviews Go hands-on
- Camera Reviews Hands-on with our favorite cameras
- Lens reviews Lenses tested
- Photo Accessories Reviews Reviews of useful Photo and Camera Accessories of interest to our readers
- Useful Tools & Gadgets Handy tools and gadgets we've found useful or essential in our work and want to share with you.
- What's In My Camera Bag The gear David Cardinal shoots with in the field and recommends, including bags and tools, and why
- Articles About photography
- Getting Started Some photography basics
- Travel photography lesson 1: Learning your camera Top skills you should learn before heading off on a trip
- Choosing a Colorspace Picking the right colorspace is essential for a proper workflow. We walk you through your options.
- Understanding Dynamic Range Understanding Dynamic Range
- Landscape Photography Tips from Yosemite Landscape Photography, It's All About Contrast
- Introduction to Shooting Raw Introduction to Raw Files and Raw Conversion by Dave Ryan
- Using Curves by Mike Russell Using Curves
- Copyright Registration Made Easy Copyright Registration Made Easy
- Guide to Image Resizing A Photographers' Guide to Image Resizing
- CCD Cleaning by Moose Peterson CCD Cleaning by Moose Peterson
- Profiling Your Printer Profiling Your Printer
- White Balance by Moose Peterson White Balance -- Are You RGB Savvy by Moose Peterson
- Photo Tips and Techniques Quick tips and pro tricks and techniques to rapidly improve your photography
- News Photo industry and related news and reviews from around the Internet, including from dpreview and CNET
- Getting Started Some photography basics
- Resources On the web
- My Camera Bag--What I Shoot With and Why The photo gear, travel equipment, clothing, bags and accessories that I shoot with and use and why.
- Datacolor Experts Blog Color gurus, including our own David Cardinal
- Amazon Affiliate Purchases made through this link help support our site and cost you absolutely nothing. Give it a try!
- Forums User to user
- Think Tank Photo Bags Intelligently designed photo bags that I love & rely on!
- Rent Lenses & Cameras Borrowlenses does a great job of providing timely services at a great price.
- Travel Insurance With the high cost of trips and possibility of medical issues abroad trip insurance is a must for peace of mind for overseas trips in particular.
- Moose Peterson's Site There isn't much that Moose doesn't know about nature and wildlife photography. You can't learn from anyone better.
- Journeys Unforgettable Africa Journeys Unforgettable -- Awesome African safari organizers. Let them know we sent you!
- Agoda International discounted hotel booking through Agoda
- Cardinal Photo Products on Zazzle A fun selection of great gift products made from a few of our favorite images.
- David Tobie's Gallery Innovative & creative art from the guy who knows more about color than nearly anyone else
- Galleries Our favorite images
DPS 4-15: Airline Carry-ons -- Reviews of One Bag Solutions
DigitalPro
Shooter
DPS 4-15: One-bag solutions for Airline Carry-ons, plus tips for traveling lightly
Event Note: If you're looking for a great value in a photo safari, the weak currencies in Southeast Asia make our Cambodia, Burma & Thailand trip a real bargain. At less than $5K per person for a nearly two week trip with first class accomodations & private guides throughout it's hard to beat. Give yourself the holiday gift of a January get away! LowePro RoadRunner AW:I used a RoadRunner for the first time on my recent safari to Botswana. I was attracted to the bag for two important reasons. First, it was a rolling bag. With international flight connections requiring more and more walking I thought it'd be worth trying a rolling bag instead of my usual backpack. Second, it provides a "one bag" solution by clipping its daypack onto the back of the rolling bag. Like all these bags, when they are fully assembled they are too large for the carry-on bins so the trick is to assemble them long enough to get through security at the airport and then disassemble them as needed on the plane so that everything fits nicely. The RoadRunner is very solidly made--like all the LowePro products I've ever used--and holds even more on the inside than the Computrekker Plus AW. However, there are no external pockets and only very small internal pockets unless you are using the daypack. And once the daypack is attached it is a little difficult to work out of the bag since the main "clamshell" opens from the shoulder strap side, which would place the daypack on the bottom. So for shooting out of a truck I didn't find it as convenient as a traditional bag design, but I really liked that I could leave my laptop and external drives in the daypack back at the camp and only bring along the photo pack. The RoadRunner when fully loaded is a beast of a bag (as are all of these except the MP-3), so you'll need to be fairly strong (and tall) to hoist it into an overhead bin. But if packed carefully and the daypack removed it will fit into full-size overhead bins. It will likely not fit in the bins on the RegionalJets which are in increasingly common use in the US. Also when you fully assemble the RoadRunner you need to be sure you tuck the various straps in well or they can easily get trapped under the bag or caught in the wheels. Even without the daypack, a loaded RoadRunner can be fairly heavy. It was definitely harder to lift on and off the trucks on safari than the Computrekker Plus, but having the rolling wheels can be a real lifesaver for pulling the bag long distances if you don't want to carry the nearly 40 lbs of a full bag on your back al the time. It is also physically longer than the Computrekker Plus, which made it a little harder to work with in a truck but also lets you use a slightly longer lens+camera combo. Either bag accomodates a D-SLR plus 200-400 or 300f/2.8 quite well. One unusual thing about the RoadRunner is that to allow the daypack to attach on the "flat" side of the bag the clamshell opening is actually on the strap side. So you physically lift the side of the pack with the straps when you're using it as a camera bag. This isn't difficult, but it does create a couple small issues. First, if you have the waistbelt attached it can get in the way as it has to be lifted along with the clamshell. And second, there are various "batwing" straps designed to help the bag's zipper hold the full load that can also get in the way. After a couple days I got used to opening and closing the bag without the straps tangling, but it was a little tricky at first. Aside from the awkwardness of having to lift the shoulder strap side to use the bag the only real gripe I have with it is the shoulder strap system itself. The shoulder straps attach to a removable waistbelt. Unfortunately the waistbelt is quite large and makes it difficult to fit the bag into an overhead compartment. Removing the waistbelt provides no anchor point for the shoulder straps. For me, the whole reason for having a backpack style roller is to be able to hoist it over a shoulder for short transfers. I was able to create a makeshift solution by tying the backpack strap to the bottom handle of the bag, but it would have been a simple matter for LowePro to provide a D-ring for that purpose. Their reasoning is that because of the weight of the bag it'd be used more with the waistbelt, but I don't really think most people backpack with something like a RoadRunner. Most people I know use them for short hauls to vehicles or locations. If you don't have a long lens like my 200-400 or a 500f/4 you can also look at the lighter & smaller RoadRunner Mini. I haven't used one personally, but if it is built the same way and fits your gear it might be a good compromise. You can purchase the Roadrunner online for a discounted $425, or the RoadRunner Mini for $289. Pelican 183:The Pelican 183 is different from the other bags in this review because it is not a backpack at all, but a more classic rolling bag, similar to the LowePro rollers. And unlike traditional Pelicans it is soft-sided. It features an excellent zip-off laptop shoulder pack which is large enough to hold a beefy laptop and assorted accessories and paperwork. One of my motivations for trying it was to find a soft-sided bag that could be used in place of my rolling Pelican 1510s, since those seem to be targeted for theft at some airports. The Pelican is well made, easy to roll and the zip-off shoulder pack is surprisingly easy to remove and re-attach. It is designed so that the main bag meets standard carry-on size limits when the shoulder pack is removed. It isn't really designed to be checked, both because the walls are not quite as solid as those on a LowePro Roller (mine started to bow after use) and because there is no good way to lock it. I would have liked to see them add little lock points to the zippers as otherwise the best you can do is lock the ends of the zipper pulls. The Pelican comes with a set of flexible padded dividers and is easy to configure for whatever you need. I used mine for a variety of equipment that didn't fit in my other photo pack. The shoulder pack was convenient for carrying my laptop separately around the camps or hotels. The Pelican 183 is a fairly new product, but B&H is accepting orders for them at the discounted price of $263. WRP MP-3c
You can purchase the MP-3c directly from WRP for $395, or the photo backpack only version, the MP-3 for $297. LowePro Computrekker Plus AW / Computrekker AWFor those familiar with the more traditional NatureTrekker and PhotoTrekker, the Computrekker has the same basic shape but replaces an inch or two of the main compartment with a slot for your laptop. The front pockets are also redesigned to be more "briefcase-like". If your longest lens is a 300f4 or 70-200f/2.8 and your camera bodies aren't too bulky then the Computrekker AW is a nifty small backpack. Since I always enjoyed traveling with my Nature Trekker it was a no brainer for me to switch to the Computrekker for long trips where I didn't need much photo gear. Unfortunately a 200-400 attached to a camera body won't fit in the Computrekker, so you need the Plus version. It is much bigger and heavier For my next trip to Cambodia and Burma for example, I'm probably going to leave my 200-400 behind so I can fit everything into the smaller Computrekker AW. That gives me a good combination of backpack I can keep with me and easily haul around that can also accomodate my laptop as needed. You can purchase the Computrekker AW online at a discounted $129, or the larger Computrekker Plus AW for $169. Tricks for making your gear fitNo matter what bag you have, it always seems hard to get everything in it. But there are a few strategies you can use for helping reduce the amount you need to carry:
A Note on Eye Contact in Wildlife Images
Get a head start on Photoshop CS3!Photoshop CS3 public beta available: You can download Adobe Photoshop CS3 beta from the Adobe Labs website. Note that you'll need a valid CS2 serial number to use it. For CS2 users you'll feel right at home. The new docking tool panels are a nice touch. There are also some very powerful new commands for aligning multiple images as layers, but I haven't gotten a chance to try them out yet. Camera Raw is also enhanced, although in some ways I think I like the CS2 method of showing "Auto" boxes on each slider better than the new version, but I'm sure Adobe will be tweaking it between now and release. They've put a timeout of May 31 on parts of the software so that gives you some idea of their release timeframe for the product version. Let's hear from you!Let us know what is working for you in our Photo forums, where we've had a number of active discussions on digital workflow choices depending on the needs of the individual photographer.
|
|||||||||||||
|
|
All contents copyright Pro Shooters LLC. All rights reserved.
Nikon is a trademark of Nikon Corporation.
nikondigital.org is not affiliated with Nikon Corporation.
nikondigital.org
If you have a hot tip or news item for DigitalPro Shooter,
write us at dps@proshooters.com. If
your tip or news item is picked as the Shooters' Tip of the Week, we'll send you
a really cool DigitalPro hat! Or just write us to let us know what you think of
the newsletter.
To keep up with the latest articles and reviews, join
me at http://www.nikondigital.org.
For the latest versions of DigitalPro, visit
http://www.proshooters.com/dp.
Good shooting!
--David Cardinal, editor DigitalPro Shooter
nikondigital.org / Pro Shooters LLC
To Unsubscribe, please click here.
- Log in to post comments

 Recently there have been a flurry of reports of airports enforcing a 1-bag carry on limit--strictly enough to preclude a second "rolling briefcase" carry-on. Personally I've still found that I've been able to get a standard camera backpack and rolling briefcase aboard my flights if I'm friendly and get my bags stowed promptly, but since it is such a hot topic and having only a single bag to lug around airports is appealing I've spent the last few months testing out traveling with four different "all in one" bags that are designed to provide a complete travel solution for your camera gear and computer. None of the bags is perfect, but all of them are well designed and well built. Each has unique strengths, weaknesses and particular situations where it is ideal. In this issue I'll take you through my experiences with the four bags to help you decide which of them might be best for you. The four bags are the LowePro RoadRunner AW, the Pelican 183, the WRP MP-3c and the LowePro Computrekker / Computrekker Plus AW. We also provide some tips for making your gear fit in your bag.
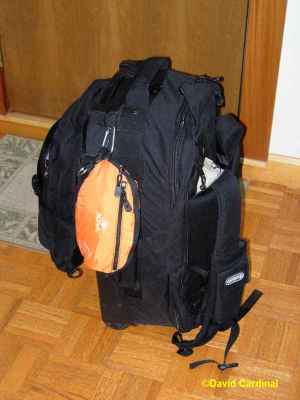
 The MP-3 and its larger cousin the MP-1 continue to be my favorite bags for working out of my truck. And the MP-3 is the only bag I've found that will both fit my 200-400 lens (or a 500f4) and fit in the overhead compartment of the growing number of Canadair RegionalJets found on short-haul flights around the US. The tradeoff for the effective use of space and light weight of the MP-3 is that the shoulder straps are designed for short hauls and not for any real hiking and the bag itself is not as stiff or heavily padded as the other bags--which can be an issue overseas where sometimes it is hard to avoid having porters or baggage handlers move your gear. But for occasions where you can keep direct control of your gear it is the most effecient way to transport your camera gear that I know of. When you clip the optional computer case (thus the "c" in the model number) onto the side the bag can serve as an "all in one" with both your camera and computer. Like the other bags the idea is to unclip the computer case once you're on the plane and stow the camera bag overhead.