- Photo Safaris »
- Photo Safaris
- Alaska Bears & Puffins World's best Alaskan Coastal Brown Bear photo experience. Small group size, idyllic location, deluxe lodging, and Puffins!
- Participant Guestbook & Testimonials Candid Feedback from our participants over the years from our photo safaris, tours and workshops. We don't think there is any better way to evaluate a possible trip or workshop than to find out what others thought.
- Custom Photo Tours, Safaris and Personal Instruction Over the years we've found that many of our clients & friends want to participate in one of our trips but the dates we've scheduled just don't work for them or they'd like a customized trip for their family or friends.
- Myanmar (Burma) Photo Tour Myanmar (Burma) Photo Tour December 2017 -- with Angkor Wat option
- Reviews Go hands-on »
- Reviews Go hands-on
- Camera Reviews Hands-on with our favorite cameras
- Lens reviews Lenses tested
- Photo Accessories Reviews Reviews of useful Photo and Camera Accessories of interest to our readers
- Useful Tools & Gadgets Handy tools and gadgets we've found useful or essential in our work and want to share with you.
- What's In My Camera Bag The gear David Cardinal shoots with in the field and recommends, including bags and tools, and why
- Articles About photography »
- Articles About photography
- Getting Started Some photography basics »
- Getting Started Some photography basics
- Travel photography lesson 1: Learning your camera Top skills you should learn before heading off on a trip
- Choosing a Colorspace Picking the right colorspace is essential for a proper workflow. We walk you through your options.
- Understanding Dynamic Range Understanding Dynamic Range
- Landscape Photography Tips from Yosemite Landscape Photography, It's All About Contrast
- Introduction to Shooting Raw Introduction to Raw Files and Raw Conversion by Dave Ryan
- Using Curves by Mike Russell Using Curves
- Copyright Registration Made Easy Copyright Registration Made Easy
- Guide to Image Resizing A Photographers' Guide to Image Resizing
- CCD Cleaning by Moose Peterson CCD Cleaning by Moose Peterson
- Profiling Your Printer Profiling Your Printer
- White Balance by Moose Peterson White Balance -- Are You RGB Savvy by Moose Peterson
- Photo Tips and Techniques Quick tips and pro tricks and techniques to rapidly improve your photography
- News Photo industry and related news and reviews from around the Internet, including from dpreview and CNET
- Resources On the web »
- Resources On the web
- My Camera Bag--What I Shoot With and Why The photo gear, travel equipment, clothing, bags and accessories that I shoot with and use and why.
- Datacolor Experts Blog Color gurus, including our own David Cardinal
- Amazon Affiliate Purchases made through this link help support our site and cost you absolutely nothing. Give it a try!
- Forums User to user
- Think Tank Photo Bags Intelligently designed photo bags that I love & rely on!
- Rent Lenses & Cameras Borrowlenses does a great job of providing timely services at a great price.
- Travel Insurance With the high cost of trips and possibility of medical issues abroad trip insurance is a must for peace of mind for overseas trips in particular.
- Moose Peterson's Site There isn't much that Moose doesn't know about nature and wildlife photography. You can't learn from anyone better.
- Journeys Unforgettable Africa Journeys Unforgettable -- Awesome African safari organizers. Let them know we sent you!
- Agoda International discounted hotel booking through Agoda
- Cardinal Photo Products on Zazzle A fun selection of great gift products made from a few of our favorite images.
- David Tobie's Gallery Innovative & creative art from the guy who knows more about color than nearly anyone else
- Galleries Our favorite images
Using Infrared to improve your color photos: Cutting through fog
Using Infrared to improve your color photos: Cutting through fog
Submitted by David Cardinal on Tue, 02/19/2013 - 09:32
 Infrared is its own special kind of photography, and can provide plenty of really great images on its own. In addition to making great images of temples and landscapes, Infrared images can also be a tool to improve your color photographs. Currently the techniques in this article are a little advanced, and require some fairly specialized camera hardware, but if they catch on then it is only a matter of time before they are embedded in popular cameras and software solutions. In the meantime, for those willing to do some extra work, the result can be seemingly impossible photographs.
Fog and haze don’t have to ruin your photography
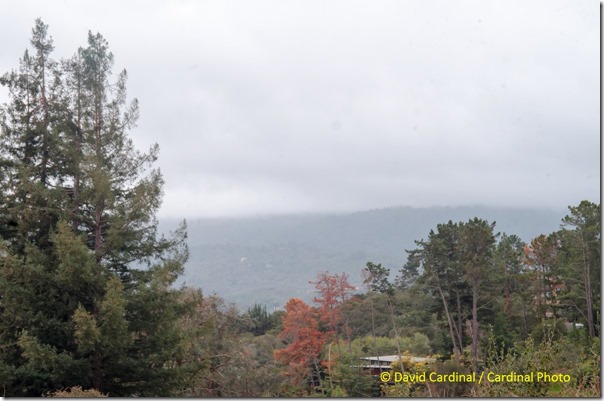
While a small amount of fog or haze can make for wonderful, moody photographs, too much will ruin almost any image. Amazingly, infrared photographs can often cut through otherwise impenetrable atmospheric affects, meaning that if you have the right equipment you don’t need to give up on creating your ideal image. To illustrate this, I took a shot from our back deck on a foggy evening. Even though the trees in the foreground are sharp, the fog in the valley in the background renders it almost invisible. With a typical camera, there wouldn’t be any way to get to the underlying detail of those distant trees.
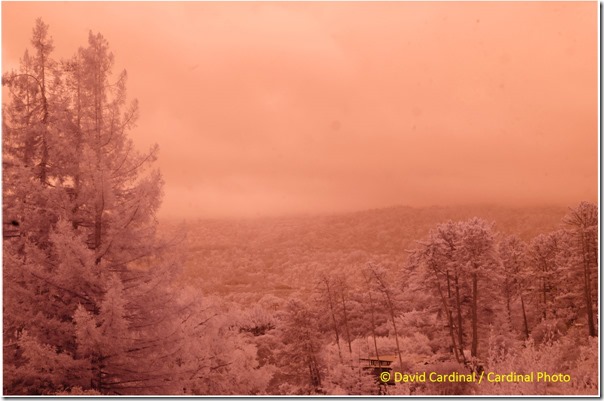
Infrared light can often cut through haze and fog, providing a way to get amazing detail from otherwise murky scenes. Unfortunately, infrared light – because it is invisible to us – doesn’t map nicely into colors we can see. So Infrared images are typically processed as black and white, or in some type of faux color. For a natural landscape like this one, though, my goal was to render the original colors. For that I needed to shoot both an Infrared of the scene and a full-color image.
Fortunately, I have converted my Nikon D7000 to a full-spectrum camera, that can capture either visible light or near Infrared (IR), depending on the filter I use. So I was able to capture this first image using a so-called Hot Mirror (aka UV+IR) filter that blocked out the infrared and only allow visible light to pass. The result is accurate colors and good detail in the foreground, but nearly nothing in the middle distance. So I replaced the hot mirror filter with one that blocks visible light (in this case a 720nm “IR” filter that only passes Infrared light above 720nm) and took another shot – using a tripod to ensure that the framing of the two images was as close as possible. You can see from the image below that even though the IR image gets all the colors “wrong” it does cut through the fog quite nicely.
How the ‘miracle’ of cutting through fog works
Small particles scatter light, including fog, haze, clouds, and even the sky. A physicist named Rayleigh figured out that shorter wavelengths of light were more subject to scattering. That’s why the sky is blue (blue is the shortest visible wavelength, and is scattered the most by the small particles making up the atmosphere). Infrared light (even the near Infrared captured by converted cameras at 700nm – 1000nm wavelengths) has a longer wavelength than visible light (which is 400nm [blue] to 700nm [red]). As a result, it is scattered less by the small particles that make up most haze and fog. To the eye, this is nearly magical, as hazy seems suddenly have well-defined detail. Longer wavelengths penetrate even better, but long wavelength photons don’t have enough energy to register on the silicon used in camera sensors. Silicon will record light up to about 1100nm at best. Longer wavelengths (like thermal Infrared) require specially constructed sensors.
Alignment and Cropping
Because our camera can’t capture Infrared and visible light in the same frame, we need to manually capture multiple frames using different filters. This almost always results in a small mis-alignment between the image. Because IR & visible light focus at different places, the mis-alignment is a little worse than with two color images. Fortunately, Photoshop has provided a great tool to re-align your images. By using the Photoshop Script “File->Scripts->Load Files into Stacks…” you can quickly load all of your images into layers of a single image. Even better, if you check the option on the script to have Photoshop attempt to automatically align the images, they will be nicely stacked so you can operate on them right away.
The re-alignment process will create a small number of “garbage” pixels at the very edges. I’ve left them along for the screenshots in this article, but if you are going to print or sell any of your processed images, you’ll certainly want to use the crop tool to trim them off. If there is motion in your image things get trickier. Moving clouds, for example, may need to be masked so that they are only recorded from one frame or the other.
Creating the Final Image
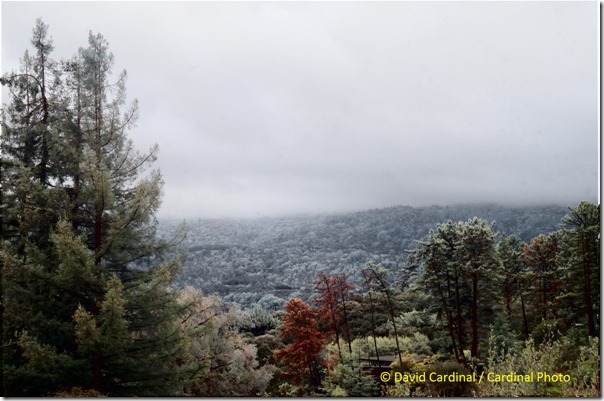
Once you’ve got your images loaded into a stack, there are a number of ways you can combine them to achieve this “fog-cutter” affect. The simplest is to make sure that the IR layer is on top and set its blend mode to Luminosity. That will give you a bit of additional detail with little extra work. However, the most effective system I’ve come up with requires a few more steps:
- Make sure you have your images stacked and aligned, with the color image on the bottom and the Infrared image on the top
- Turn the IR image monochrome, either using Adobe’s built-in B&W adjustment or nik’s Silver Efex Pro. If the process creates an extra layer, use the “Layer->Merge down” command to make a single B&W layer from the IR image that you can work with later. For this image I chose the High Structure & Contrast preset of nik, as I really wanted to bring out detail in the image.
- Convert your image to Lab mode (Image->Mode->Lab). Don’t flatten it! Lab mode is pretty cool, because it separates the luminance (lightness) data into the L channel, while keeping all the color data in the a and b channels.
- Go to the lower (color) layer and make the Channels palette visible.
- Select the Luminosity channel.
- Using the Image->Apply command, apply the B&W layer you’ve created to the Luminosity channel. This will “borrow” the luminosity (lightness) data from your IR image, while keeping all the color data from your color image (which is store in the a&b channels).
- Make your IR channel invisible (click the eye on the layers palette to unselect it), so that you can see the results of your blended “fog cutter” image!
Future Improvements
One of the side-effects of this technique is increased contrast everywhere in the image – including in the areas like the trees which already have quite a bit of detail. If you don’t like the new look of the nearby trees, it is easy enough to mask them off. I haven’t found a way to perfectly add contrast to the low contrast areas, while dialing back the effect on the already high-contrast areas, at least not yet. I’d also like to make the process of combining images more automated, and not have it require Lab mode, which can be kind of a pain to work with.
Another area where I want to do some experimenting is reducing motion artifacts. Tools like HDRSoft’s Photomatix Pro and PhotoAcute both offer excellent “ghost removal,” but don’t natively do Visible+IR merging at the same time. So there is definitely room for some new product features to further facilitate this photographic technique.
If you want to do this yourself, Kolari Vision and LifePixel are two great companies that will perform full-spectrum conversions for you.


