- Photo Safaris
- Alaska Bears & Puffins World's best Alaskan Coastal Brown Bear photo experience. Small group size, idyllic location, deluxe lodging, and Puffins!
- Participant Guestbook & Testimonials Candid Feedback from our participants over the years from our photo safaris, tours and workshops. We don't think there is any better way to evaluate a possible trip or workshop than to find out what others thought.
- Custom Photo Tours, Safaris and Personal Instruction Over the years we've found that many of our clients & friends want to participate in one of our trips but the dates we've scheduled just don't work for them or they'd like a customized trip for their family or friends.
- Myanmar (Burma) Photo Tour Myanmar (Burma) Photo Tour December 2017 -- with Angkor Wat option
- Reviews Go hands-on
- Camera Reviews Hands-on with our favorite cameras
- Lens reviews Lenses tested
- Photo Accessories Reviews Reviews of useful Photo and Camera Accessories of interest to our readers
- Useful Tools & Gadgets Handy tools and gadgets we've found useful or essential in our work and want to share with you.
- What's In My Camera Bag The gear David Cardinal shoots with in the field and recommends, including bags and tools, and why
- Articles About photography
- Getting Started Some photography basics
- Travel photography lesson 1: Learning your camera Top skills you should learn before heading off on a trip
- Choosing a Colorspace Picking the right colorspace is essential for a proper workflow. We walk you through your options.
- Understanding Dynamic Range Understanding Dynamic Range
- Landscape Photography Tips from Yosemite Landscape Photography, It's All About Contrast
- Introduction to Shooting Raw Introduction to Raw Files and Raw Conversion by Dave Ryan
- Using Curves by Mike Russell Using Curves
- Copyright Registration Made Easy Copyright Registration Made Easy
- Guide to Image Resizing A Photographers' Guide to Image Resizing
- CCD Cleaning by Moose Peterson CCD Cleaning by Moose Peterson
- Profiling Your Printer Profiling Your Printer
- White Balance by Moose Peterson White Balance -- Are You RGB Savvy by Moose Peterson
- Photo Tips and Techniques Quick tips and pro tricks and techniques to rapidly improve your photography
- News Photo industry and related news and reviews from around the Internet, including from dpreview and CNET
- Getting Started Some photography basics
- Resources On the web
- My Camera Bag--What I Shoot With and Why The photo gear, travel equipment, clothing, bags and accessories that I shoot with and use and why.
- Datacolor Experts Blog Color gurus, including our own David Cardinal
- Amazon Affiliate Purchases made through this link help support our site and cost you absolutely nothing. Give it a try!
- Forums User to user
- Think Tank Photo Bags Intelligently designed photo bags that I love & rely on!
- Rent Lenses & Cameras Borrowlenses does a great job of providing timely services at a great price.
- Travel Insurance With the high cost of trips and possibility of medical issues abroad trip insurance is a must for peace of mind for overseas trips in particular.
- Moose Peterson's Site There isn't much that Moose doesn't know about nature and wildlife photography. You can't learn from anyone better.
- Journeys Unforgettable Africa Journeys Unforgettable -- Awesome African safari organizers. Let them know we sent you!
- Agoda International discounted hotel booking through Agoda
- Cardinal Photo Products on Zazzle A fun selection of great gift products made from a few of our favorite images.
- David Tobie's Gallery Innovative & creative art from the guy who knows more about color than nearly anyone else
- Galleries Our favorite images
Wind? Don’t Let It Spoil Your Macro Fun!
Wind? Don’t Let It Spoil Your Macro Fun!
Submitted by David Cardinal on Thu, 08/04/2011 - 10:15
 All macro photographers know wind as their number one enemy. While poor light can be coddled and shaped with flash and reflectors wind is more recalcitrant. Sure you can freeze a stem or two with a Plamp or line your friends up as a wind break but if there is enough of a breeze there is no way to get both the depth of field (small aperture) and frozen motion (high shutter speed) at the same time. That’s what happened to me when I was out in our relatives’ vegetable garden attempting to test out my review Olympus E-P3 PEN camera (aka Olympus PEN 3) and avoiding the work of berry picking. But that didn’t mean the fun had to stop…
Some of my favorite plant photographs have been deliberate blurs taken in windy conditions. Wind blurs are the landscape photographers’ equivalent to flock “blast offs” and motion blurs which have become so popular with wildlife shooters. As with any shot depending on a blur there are a few simple guidelines but success is largely related to patience and persistence.
Tips For Shooting A Wind Blur
First and foremost the whole idea is to force a blur so you need to switch your mindset around. If you shoot in Aperture priority, stop your aperture down (letting in less light which will force your camera to cause the shutter to stay open longer). Or if you prefer Shutter (Time) priority then set your camera to a low shutter speed to increase the blur. You’ll need to fiddle with the exact settings depending on how windy it is, how far away the subject is and how much blur looks good to you but you can start as a guideline at about 1 over the wind speed seconds for your shutter speed (e.g. for a 20mph wind start with 1/20s shutter speed).
Sidebar: How Aperture Affects Depth of Focus (DOF)


You can see the dramatic difference in DOF between the image on the left,
shot at f/2.8 with the E-P3’s 17mm len and the f/22 version on the right.
The one on the right required a shutter speed of 1s, hand-held using the excellent
stabilization built-in to the Olympus E-P3 camera.
You’ll probably find you need to adjust your ISO down to a fairly low level to accommodate these settings and if you have AutoISO on you may need to turn it off (since AutoISO is specifically designed to change your ISO to reduce blur). If you’re planning to use a flash you’ll also have to set your camera to “Slow” or “Rear” Sync or else when you turn on the flash the camera will automatically increase the shutter speed to at least 1/60s.
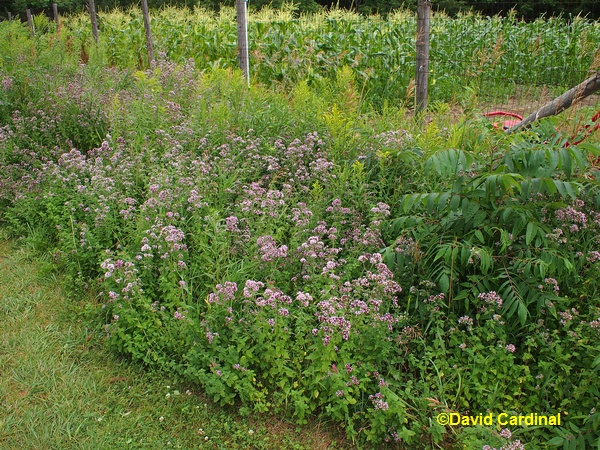
Oregano Patch taken with "typical" settings (on a breezy day)
Olympus E-P3 Camera w. 17mm Lens, 1/125s @ f/5.6, ISO 200
Whether you use a tripod is really up to you. Just because you’re trying to blur the subject doesn’t mean that you don’t want a steady camera. One of the tricks to any kind of good blur shot is to maximize the intended blur effect (in this case the wind, with birds their motion in flight) while minimizing other distracting motion that would take away from the main event. So if you don’t use a tripod make sure you have your camera held steady against the wind. Amazingly you can actually use most Image Stabilizers to help as they are designed to reduce the effect of your motion, not the subject’s motion.
Fine-tuning Your Composition

Original JPEG image, Olympus E-P3 with 17mm Lens
1/8s @ f/22, ISO 200, Image Stabilization On
After that the rest is pretty much up to you. Try different compositions to see which ones are appealing and this is one time when it is perfectly fine to “chimp” (peek at your images on the LCD) since that is really the only way you can visualize the effect the wind is having on your image. Don’t be afraid to experiment. If you’re not getting enough blur then either try to time your shots with gusts of wind or reduce your shutter speed further. And of course the opposite applies if you’re seeing too much blur.
In my case I noticed that the larger leaves of the Oregano plants would move much further than the smaller ones, making some of the image appear sharp while the rest blurred. So I experimented with moving around to place the blown leaves in various parts of the frame. After 20 or 30 shots I had a few I liked well enough to play with later.
Processing Your Images

The original image processed using the Olympus E-P3’s built-in “Pop-art” filter
(accomplished by running the filter on the Olympus Raw file)
You can have a lot of fun with wind blurs simply using the shooting modes on your camera. It is a perfect time to experiment with Vivid or Landscape or in the case of the Olympus which packs a host of “ART” filters, Pop Art worked quite well for flowers. But if you prefer the added flexibility of fiddling after the fact that is easy enough to accomplish in Photoshop.
Once you have the shots they’re easy to experiment with on the computer. Photoshop CS5’s new command “Image->Adjustments->HDR Toning…” is perfect for adding some drama to a single image—even though technically of course your image won’t be HDR. You can try the different presets to see which ones you like. Whatever the outcome you’ll wind up with some interesting results and have a lot more fun than if you stood around moping about the dreadful wind. Try it the next time wind gets in your way!

Image after processing with Photoshop CS5’s HDR Toning Filter
Learning and Doing More…
Please feel free to share your wind blur efforts in our forums and if you’d like to have more fun with new ways to photography scenics, plants, fall color and the wonders of Texas Cowboy Country right alongside some of the world’s best bird photography please join us for our November Photo Safari to the Hill Country of Texas where we’ll get to do all that an more while staying on a historic ranch with fully restored stone farmhouses.
 Restored Chuckwagon shot at night lit with Flashlights and post-processed on our
Texas Hill Country Safari. Come join us for some great photography and Texas hospitality!
- Log in to post comments

Latest posts
-
Tue, Jun 14 2022
-
Fri, Jul 9 2021
-
Mon, Mar 1 2021
-
Tue, Mar 3 2020
-
Wed, Jan 15 2020
-
Mon, Nov 11 2019