- Photo Safaris
- Alaska Bears & Puffins World's best Alaskan Coastal Brown Bear photo experience. Small group size, idyllic location, deluxe lodging, and Puffins!
- Participant Guestbook & Testimonials Candid Feedback from our participants over the years from our photo safaris, tours and workshops. We don't think there is any better way to evaluate a possible trip or workshop than to find out what others thought.
- Custom Photo Tours, Safaris and Personal Instruction Over the years we've found that many of our clients & friends want to participate in one of our trips but the dates we've scheduled just don't work for them or they'd like a customized trip for their family or friends.
- Myanmar (Burma) Photo Tour Myanmar (Burma) Photo Tour December 2017 -- with Angkor Wat option
- Reviews Go hands-on
- Camera Reviews Hands-on with our favorite cameras
- Lens reviews Lenses tested
- Photo Accessories Reviews Reviews of useful Photo and Camera Accessories of interest to our readers
- Useful Tools & Gadgets Handy tools and gadgets we've found useful or essential in our work and want to share with you.
- What's In My Camera Bag The gear David Cardinal shoots with in the field and recommends, including bags and tools, and why
- Articles About photography
- Getting Started Some photography basics
- Travel photography lesson 1: Learning your camera Top skills you should learn before heading off on a trip
- Choosing a Colorspace Picking the right colorspace is essential for a proper workflow. We walk you through your options.
- Understanding Dynamic Range Understanding Dynamic Range
- Landscape Photography Tips from Yosemite Landscape Photography, It's All About Contrast
- Introduction to Shooting Raw Introduction to Raw Files and Raw Conversion by Dave Ryan
- Using Curves by Mike Russell Using Curves
- Copyright Registration Made Easy Copyright Registration Made Easy
- Guide to Image Resizing A Photographers' Guide to Image Resizing
- CCD Cleaning by Moose Peterson CCD Cleaning by Moose Peterson
- Profiling Your Printer Profiling Your Printer
- White Balance by Moose Peterson White Balance -- Are You RGB Savvy by Moose Peterson
- Photo Tips and Techniques Quick tips and pro tricks and techniques to rapidly improve your photography
- News Photo industry and related news and reviews from around the Internet, including from dpreview and CNET
- Getting Started Some photography basics
- Resources On the web
- My Camera Bag--What I Shoot With and Why The photo gear, travel equipment, clothing, bags and accessories that I shoot with and use and why.
- Datacolor Experts Blog Color gurus, including our own David Cardinal
- Amazon Affiliate Purchases made through this link help support our site and cost you absolutely nothing. Give it a try!
- Forums User to user
- Think Tank Photo Bags Intelligently designed photo bags that I love & rely on!
- Rent Lenses & Cameras Borrowlenses does a great job of providing timely services at a great price.
- Travel Insurance With the high cost of trips and possibility of medical issues abroad trip insurance is a must for peace of mind for overseas trips in particular.
- Moose Peterson's Site There isn't much that Moose doesn't know about nature and wildlife photography. You can't learn from anyone better.
- Journeys Unforgettable Africa Journeys Unforgettable -- Awesome African safari organizers. Let them know we sent you!
- Agoda International discounted hotel booking through Agoda
- Cardinal Photo Products on Zazzle A fun selection of great gift products made from a few of our favorite images.
- David Tobie's Gallery Innovative & creative art from the guy who knows more about color than nearly anyone else
- Galleries Our favorite images
Making a Great Promotional Banner – Step by Step
Making a Great Promotional Banner – Step by Step
Submitted by David Cardinal on Wed, 02/10/2010 - 13:18
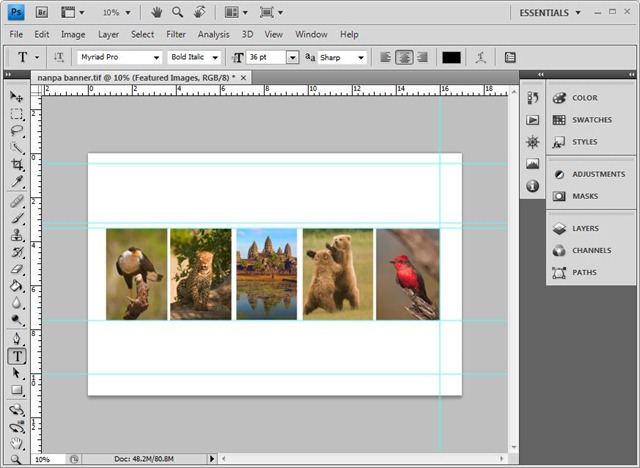
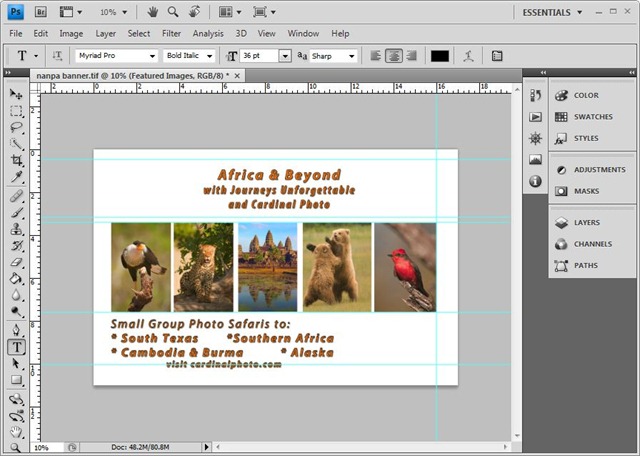
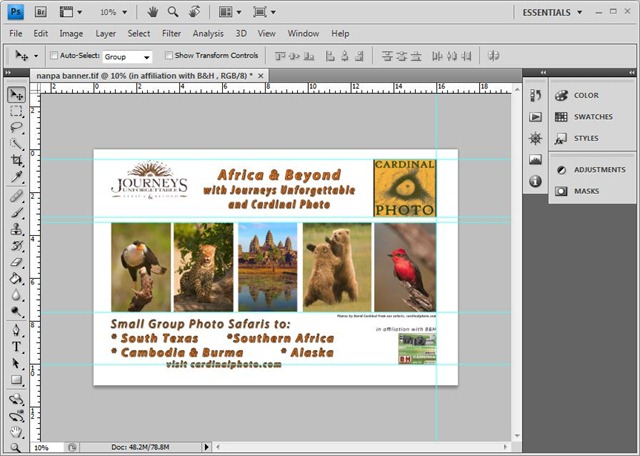
I’m in no way a graphics designer, but as a photographer and safari leader I spend time and money promoting my work and my trips. From time to time I have an opportunity to feature a large display banner. Next week at the NANPA Summit our partners Journeys Unforgettable will be sharing a booth with B&H and featuring our joint trips. So it was time for a quick banner. Fortunately as a photographer I have one of the world’s most powerful graphic arts tools—Photoshop—at the ready. But building a banner requires using it in some different ways from the way we usually do as photographers. If this is a task you’ve been worried about taking on for yourself, it is easier than you think. Read on to learn how I did it… The first step is to think of a good layout. Don’t be afraid to borrow from other banners you’ve seen. In my case I wanted to showcase images from my safaris since great images are the best way to sell great trips. I decided that to feature them they should take up the middle third of the horizontal banner. I started with a layout of a mix of vertical and horizontal images but decided that to be able to feature all of my destinations I really needed to pack them in a little with a full vertical design. So I created a new Photoshop document sized at 11” x 17” at 300dpi (I use Photoshop CS4 but you can do all this with many earlier versions just as well). That is enough to print a reasonable initial size version of the banner and since my plan was to use all scalable components I could easily resize the banner later. The key is then to use the Place command to get the images where you want them. File->Place quickly allows you to put a live version of any image on your banner layout. Once you click on the Place command and select an image it will be featured with a bounding box. Hold the Shift key down (to keep the aspect ratio correct) and drag the image to the size you want. At the same time you can quickly rotate or flip the image. In my case I like to have the animals facing towards the middle of the banner so when needed I flipped the images horizontally. You can also see that I’ve helped myself place the images using Guide lines. Simply dragging the mouse down from the top ruler onto the image helps you make a horizontal guide and dragging from the left ruler lets you create a vertical guide. My five featured images now appear the way I want them but are still Smart Objects so I can always go back and edit them or easily re-position them. One or two of the images were a little wide so I simply added a Vector mask and created a quick rectangle mask to crop the image to the size I needed. The next step was to add the promotional text. Photoshop makes that easy and fun as well. Simply using the text tool I was able to place two different sections of text on the banner. Setting the font, size, color and bolding is also easy once you decide what you want. Then the fun begins. Photoshop has a nearly infinite number of built in text treatments hidden under Layer->Blending Options. In this case I used a Drop Shadow and Inner Shadow. I wanted a little more weight than the default Drop Shadow so I selected the Drop Shadow item in the Blending dialog and increased the Distance by a few pixels. The result is some good looking text laid out the way I wanted it. I could absolutely have done more with the text but my goal was to get this banner created without too much work and get it mailed off in time for the show. Now of course we were missing one of the most important parts—the promotional logos. It was easy enough to get those from our own image library and from our partners. Once again we used the Place command to put them where they looked good but didn’t distract too much from the main message about the trips. I also added a photo credit for the images and the website address for Journeys Unforgettable since it is not contained in their logo. The result is an easy to read banner (or poster) that will grab attention and communicate in a straightforward manner with show attendees. Obviously it is designed to be used in conjunction with literature that can be handed out and has more detailed information about the trip. The entire process of creating the banner took less than 30 minutes. Now of course I needed to print it. I’m fortunate enough to have two wide-format printers in my studio, so I keep the older one (an Epson 4000) loaded with a roll of Canvas most of the time. I use either Epson Canvas or Hahnemuhle Daguerre 400 Canvas, both of which are available at good prices from inkjetart.com. First, as always before I use expensive paper, I ran a nozzle check on the Epson. No sense in wasting a large canvas. In the meantime I ran a quick proof check on my Epson 4880 on photo paper just to double check the colors and the layout. After getting the Epson 4000 ready to print and verifying my proof print I was ready to load up the canvas. Now for a small banner you can use the default Epson print driver—although make sure you have a good profile for your canvas, we generate ours with Spyder3Elite. But for large canvases you may find the Epson paper size limited and need to use a RIP (Raster Image Processor). We use Imageprint 8, which has comes with a great profile for Epson canvas. It can resize images itself but for best results in this case since I have all resizeable objects in my original I resized the banner in Photoshop (once I’ve saved off my master copy I can flatten the resized version to save space) and then saved it as a TIFF ready to print. I simply dragged the image onto ImagePrint after setting the paper type (roll / Radiant White), size (17” wide x 14” long in this case to provide some extra room on top and bottom for hanging), profile (Epson Canvas, with the correct lighting selected), turned on AutoCut, rendering intent (I get the best results most often with Relative Colorimetric) and then hit the “Auto-size command to resize the image to fit the paper and then select Print. A few minutes later a picture perfect banner has finished rolling off the machine. I let it dry for 30 minutes, gave it a quick coat of PrintShield for good measure, let it dry for another 30 minutes, and it was ready to roll up and send. If I’d wanted to I could easily have placed some grommets in it for hanging from cords. I could then just as easily print off smaller versions of the banner to use for tabletop displays or even promotional handouts. From beginning to end the entire process took only about 30 minutes of real work, 30 minutes of production time, and a little bit of waiting for ink to dry. And the material cost was almost nothing. Print canvas is only a few dollars a foot and on large format printers the cost for ink isn’t much more. If you’d like to do your own banners and posters but don’t have your own large format roll printer or don’t want to hassle with buying rolls of canvas, or perhaps you’d rather print on Vinyl for outdoor or ruggedized use there are plenty of service bureaus which can take either your original file or a PDF saved from it and print and drop ship the products for you. Either way you’ve used your photographic and Photoshop assets to effectively create a promotional tool very quickly and at very low cost. Enjoy—David Cardinal
- Log in to post comments

Latest posts
-
Tue, Jun 14 2022
-
Fri, Jul 9 2021
-
Mon, Mar 1 2021
-
Tue, Mar 3 2020
-
Wed, Jan 15 2020
-
Mon, Nov 11 2019